O365 Recover From Deleted Items How Long to Appear Again Inbox
How to Recover Deleted Emails in Office 365

Microsoft Office 365 is a cloud-based solution that provides subscription services which are typically used for business purposes. You are required to buy licenses for your Microsoft Part 365 subscription for the advisable number of users to make it possible for them to access and apply enterprise-grade applications and services. Electronic mail correspondence is an essential aspect of modern-day business organization operations, only occasionally an email message tin can exist accidentally deleted. Some other bad situation that can occur is when a user loses email credentials as a effect of a cyberattack and cannot log in to their Outlook 365 account. This blog post explains how to recover deleted emails in Office 365.
Download NAKIVO Backup & Replication now and try out the Microsoft Office 365 Backup functionality for yourself.
You tin also visit the NAKIVO Community Forum and discuss how to recover deleted emails in Part 365 in a fast and efficient manner.
General Recommendations to Reduce Chances of Losing Emails
You lot can reduce the probability of having to recover accidentally deleted emails if you take measures to prevent losing emails and email accounts. The post-obit precautions can help yous avoid losing your email data:
- Strong password. Using a strong password tin can make it difficult to hack your password.
- Respect and comply with the security policy. Don't save passwords as obviously text, and don't write downwardly passwords on a piece of paper that can be accessed by other people. Don't tell passwords to people who introduce themselves every bit the back up service.
- Two-factor authentication. When this authentication method is used, an boosted security level is provided past adding a second authentication class from a range of available authentication methods. After entering a countersign to log into your Office 365 account, you take to enter a verification code or use some other configured verification option. Two-factor authentication makes hacking your account far more hard.
Defining Your Function 365 Email Recovery Strategy
To be able to restore lost or deleted data in Office 365 when required, you need to regularly perform backup and proceed those backups in a secure location. Hence, you should primarily check whether or not you already take an Office 365 backup in place which can be used for data recovery.
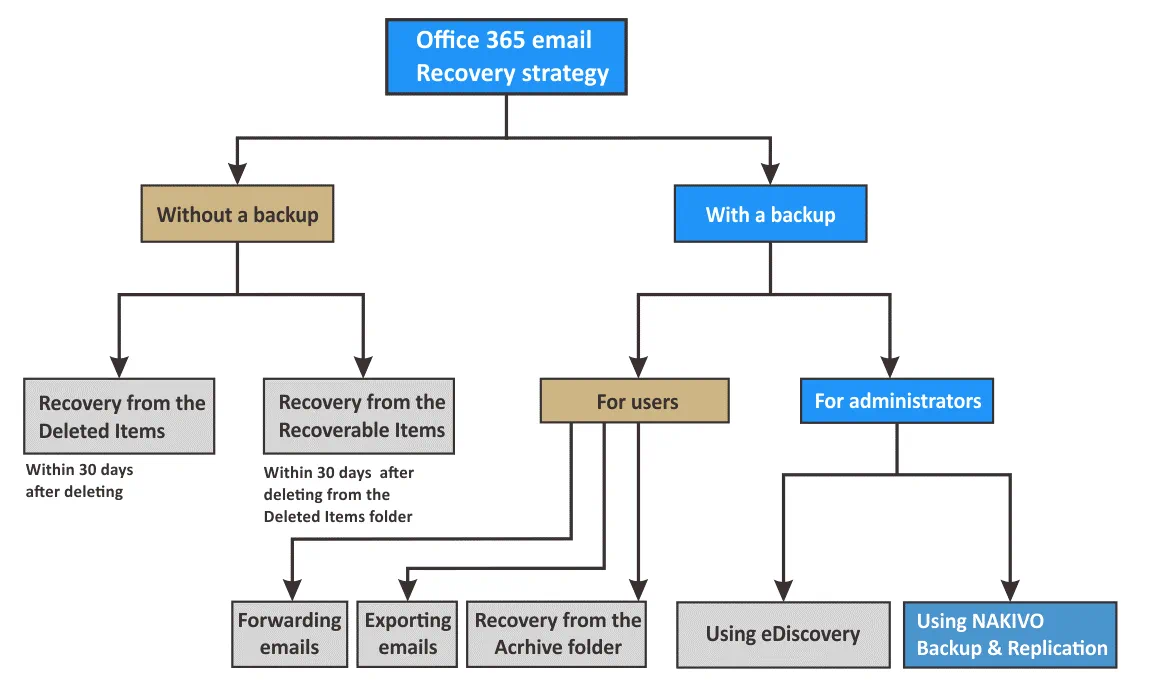
Recovery without a backup
If you haven't made a backup, bachelor recovery methods are express. The basic Office 365 email recovery methods which can be used in such case are explained in the department beneath.
Using an e-mail customer and a spider web interface in conjunction offers some advantages. Y'all possess all downloaded emails in your email client until you delete them inside the client. If you have deleted the email message in the electronic mail customer which is configured to utilise the POP3 email retrieving protocol, the bulletin will not exist deleted from the mail server immediately (if the appropriate settings are configured in the email client). As a outcome, your email message is preserved in the web interface of Microsoft Role Outlook 365 (fifty-fifty if y'all take deleted this email message in the email customer).
Notwithstanding, if you take lost your Microsoft Office 365 account as a event of a malware or hacker attack, your email messages tin be restored via your email client. Enquire a system administrator to reset the password of your Microsoft Office 365 account, an then scan your computer and all installed storage devices for viruses and malware.
As y'all can see, having a copy of your e-mail letters increases the chances of successful email recovery.
Using a web interface
Within thirty days after their deletion, emails are stored in the Deleted Items binder. Once they are deleted from the Deleted Items folder, your email messages are moved to the Recoverable Items folder. The electronic mail messages are stored in the Recoverable Items folder for 30 days and then deleted permanently and irreversibly. Thus, you even so have 60 days to restore required emails since the moment of their deletion. In this blog post, you will see how to recover deleted emails in Function 365 using the web interface when there is no backup available.
If a user notices that an of import email has been deleted and the recovery period of 60 days has already expired, the mere presence of a backup in place can save the user a lot of headache and ensure recovery of the accidentally deleted email.
Recovery from a backup
Having a backup in place of your email messages provides you with boosted recovery options. First, let's consider the native options that tin be used to back up Part 365 emails.
Use the Annal binder
If the IMAP protocol is used to recall and synchronize email messages in the email client and on a mail server, configure the archiving settings to archive email messages to the Archive folder. When yous configure email archiving, the Archive folder can be considered every bit a backup past using built-in features of Microsoft Office 365.
Configure email forwarding
Email forwarding can be enabled in the web interface of Microsoft Office 365 and past configuring the rules in Outlook desktop customer. Select the accost you want your e-mail letters to be sent to and configure it to go on copies of the forwarded letters on your first email account (it will preclude a message from deleting from the first email account afterwards forwarding). For example, we accept two email accounts:
1) michaelbose@email01.onmicrosoft.com
ii) michaelbose@nakivo.onmicrosoft.com
We can fix all incoming email messages of the michaelbose@email01.onmicrosoft.com to be forwarded to michaelbose@nakivo.onmicrosoft.com automatically to increment the probability of recovering Office 365 deleted emails. If an email message is accidentally deleted from the get-go account, it is still possible to find a copy of the message in the second account.
Export emails from Outlook
Outlook desktop client provides options to consign/import email letters to/from a PST file. This feature can be used to transfer emails from ane computer to another and backup or recover email messages. When you export your emails, they are not deleted from the e-mail client. Withal, a copy of your email messages is exported to the PST file. Go along the PST file in a safe place and use it to recover emails when needed. Yous can set up the AutoArchive feature in Outlook desktop client to consign emails automatically within the defined time menses (1 day, ii days, seven days etc.).
Using eDiscovery
eDiscovery is a tool that is available only for Microsoft Function 365 subscribers who have Function 365 Enterprise E3 and E5 plans. This tool tin exist used past system administrators who manage email accounts for a domain of the company in Office 365 Admin Center, but not by end users of Office 365 electronic mail accounts. Electronic discovery can be utilized to place and deliver data to exist used as testify for investigations and legal cases. Another popular employ instance of eDiscovery is to search, collect and consign information from Office 365 for corporate users and organizations. The export feature can be used to export emails of a user to a PST file. Emails are non recovered to the original location automatically. A user has to import the PST file manually and manage the recovered email messages as needed.
Using NAKIVO Backup & Replication
NAKIVO Fill-in & Replication is a universal data protection solution that can back up virtual, physical, and cloud environments. This is all-in-one solution that can be used to back upwardly and recover Office 365 email accounts. You can download NAKIVO Fill-in & Replication 9.2 with Microsoft Office 365 support from the official website. The backup process can be automated, making Office 365 email fill-in fast and easy.
At present that yous are familiar with the diverse methods of how to recover deleted emails in Office 365, let's find out how to recover deleted emails on exercise.
How to Recover Deleted Emails in Part 365 without Backup
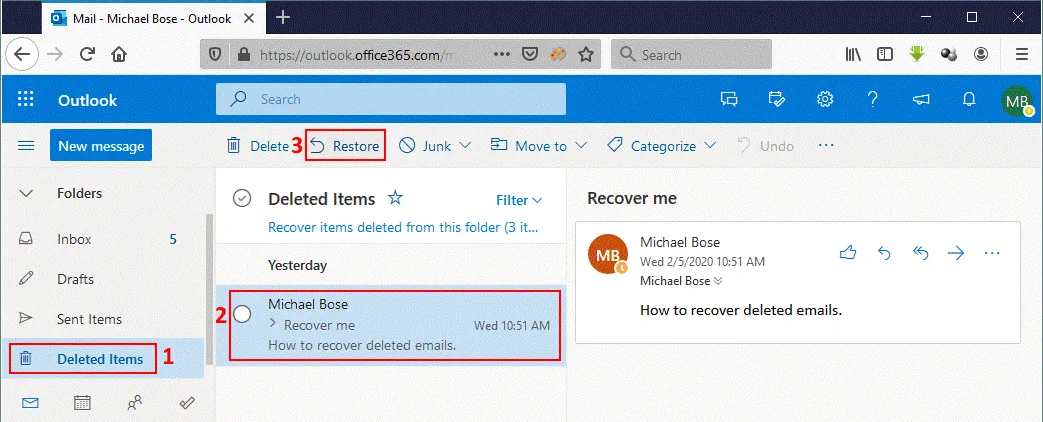
One of the nearly popular use cases is described in this section. As mentioned higher up, when using spider web interface of Microsoft Function 365 Outlook, your deleted emails can be recovered from the Deleted Items folder within 30 days. In Outlook 365 go to the Deleted Items folder and select the necessary email letters. Then click the Restore push to restore the deleted messages to the source location (emails deleted from the Inbox folder volition be recovered to the Inbox folder).
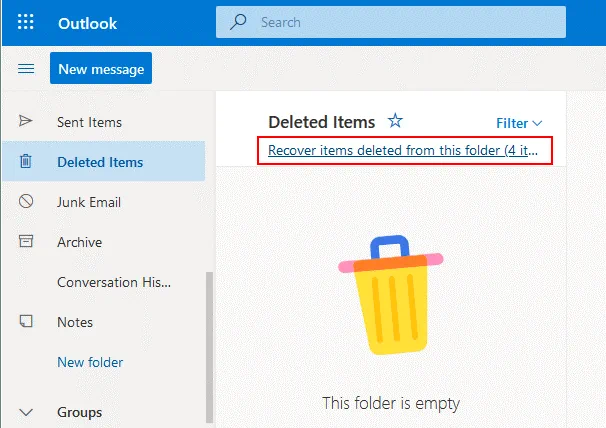
If 30 days have passed after email deletion, or you have deleted an email message from the Deleted Items binder manually, the deleted bulletin will no longer be displayed in this folder. Notwithstanding, it is even so possible to recover the deleted message from the Recoverable Items binder within xxx days after deleting it from the Deleted Items folder. On the screenshot below, you tin can see that the Deleted Items folder is empty and in that location are four items deleted from the Deleted Items binder which are still recoverable. In order to recover those items, click Recover items deleted from this binder.
At present you are in the Recoverable Items binder. Select the message you wish to recover and click Restore. The email message is recovered to the source location (the Inbox folder in our example).

How to Create a Backup of Office 365 Emails
Having a backup provides you with far greater abilities for recovering Part 365 deleted emails. Suggested fill-in approaches were explained in a higher place and now information technology's time to put them in practise. Let's review how to back up Part 365 mailboxes and email letters with NAKIVO Backup & Replication in an example. Yous have to configure environment just once and then your Role 365 mail accounts will exist backed up and protected. NAKIVO Backup & Replication is running as a Linux-based virtual apparatus in this example.
The offset action y'all have to do is find Office 365 identifiers (IDs) and register the fill-in application in the Microsoft Azure Active Directory which can be accessed by using a web browser. These identifiers which are used every bit credentials volition exist required to add your Office 365 business relationship to Inventory of NAKIVO Backup & Replication.
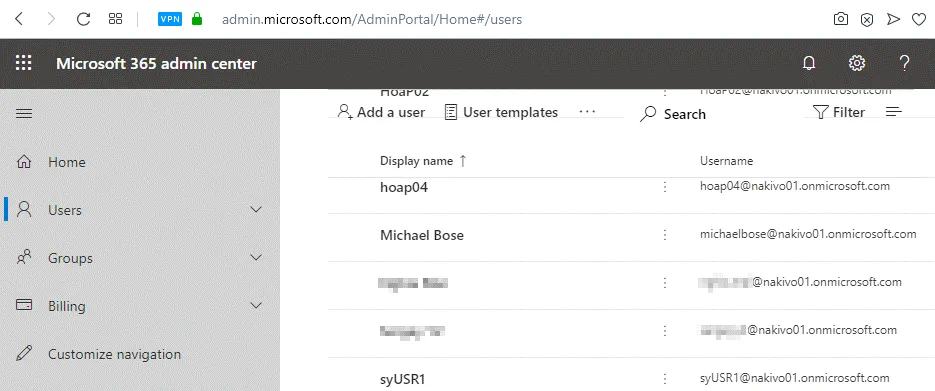
Starting conditions in this example are the following: there is a corporate account with a couple of user accounts for Microsoft Role 365, the domain name is email01.onmicrosoft.com and the admin name is admin@email01.onmicrosoft.com. Users have mailboxes in Outlook 365. Arrangement administrator can manage user accounts by visiting the web page:
https://admin.microsoft.com/AdminPortal/Abode#/homepage
Azure Active directory settings for Office 365
Yous take to perform a certain configuration before you can get the necessary credentials for adding the Office 365 account to Inventory of NAKIVO Backup & Replication. Management APIs of Office 365 utilise Azure Active Directory (Ad) for providing authentication services for non-Microsoft applications to grant rights and permit access.
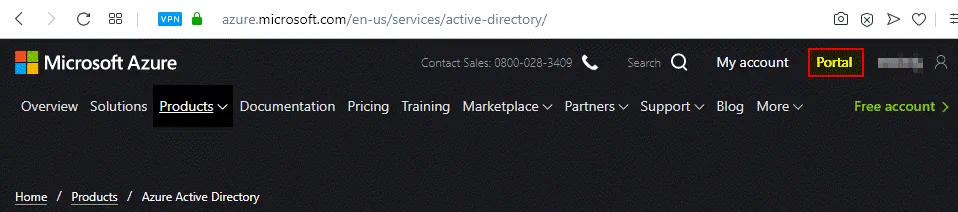
Go to Azure Active Directory settings by opening the web page:
https://azure.microsoft.com/en-usa/services/active-directory/
Log in past using an administrative account of your visitor (domain). Click Portal to open the management portal.
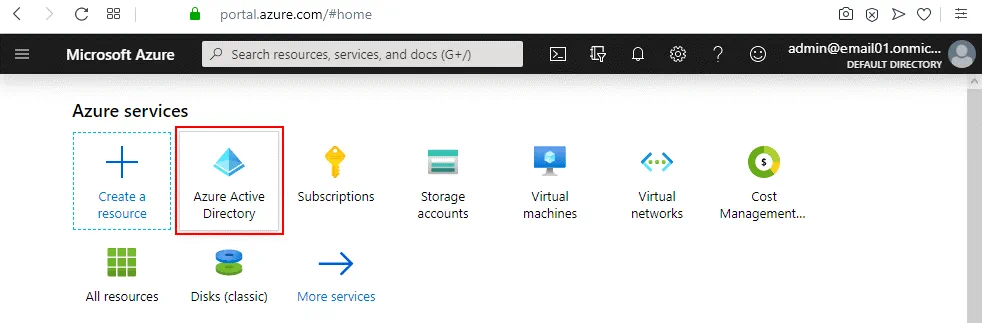
In the Azure services department, hit Azure Agile Directory to open Azure Active Directory settings.
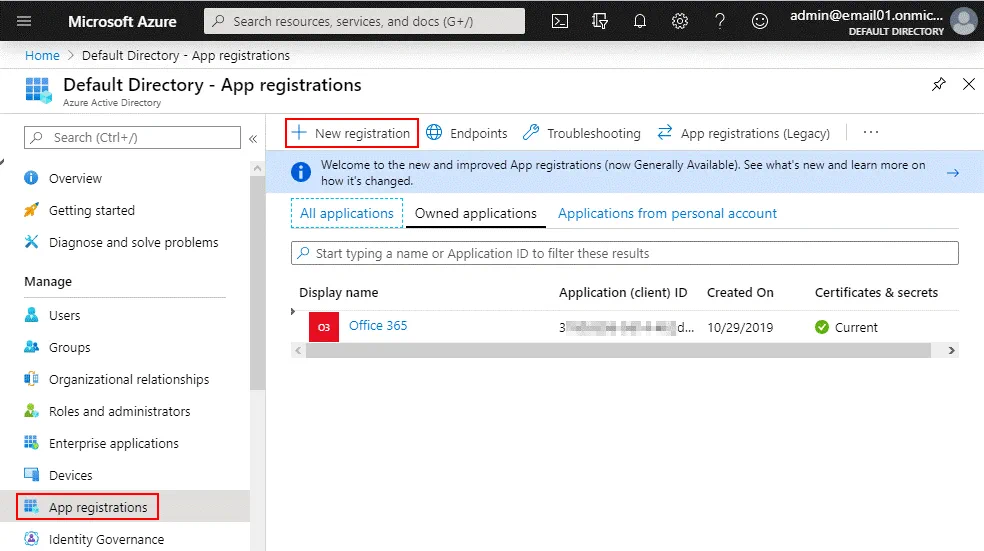
In the left pane, select App registrations and click New registration.
Note: If these options are inactive and not accessible or a network error is displayed, try using an IP accost from another country. For some strange reason, it can sometimes be impossible to load the App Registration folio in Azure Active Directory settings from certain countries. You can use a VPN service and open up this spider web page by using an external IP addresses that belong to the U.s. or the European union, for example.
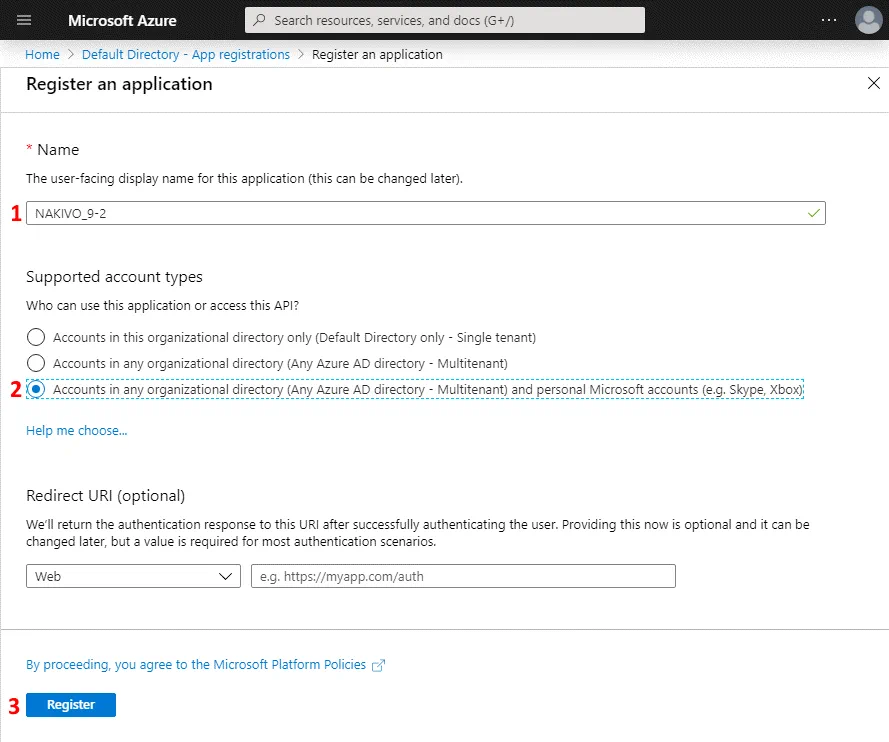
The Register an application window is opened. You have to annals NAKIVO Backup & Replication every bit the allowed application for your Office 365 account in Azure Active Directory settings. Apply the following algorithm:
i. Enter the proper name for your registered awarding, for example, NAKIVO_9-2.
ii. In the Supported business relationship types section, select:
"Accounts in whatever organizational directory (Any Azure Advertizing directory – Multitenant) and personal Microsoft accounts".
3. Click Register.
In the App Registrations > NAKIVO-9_2 > Overview section, you can run into the identifiers (IDs) – Awarding (client) ID, Directory (tenant) ID and Object ID. In the electric current example, the credentials are the following:
Application (customer) ID: vv807d81-5e44-26e5-7621-dd5e21843a6a
Directory (tenant) ID: adb12933-1385-31a7-aa4f-b614511df15a
Object ID: 1d67c837-19e0-40e6-aef5-e7ef0537271a
Write down or copy these IDs because you will need them afterward. Then click View API permissions.

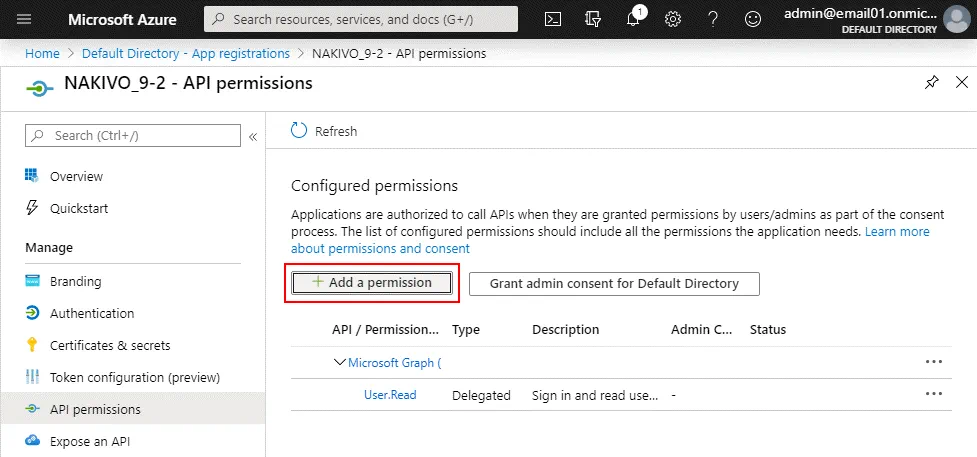
Select API permissions in the left pane. In the Configured permissions department, click Add a permission.
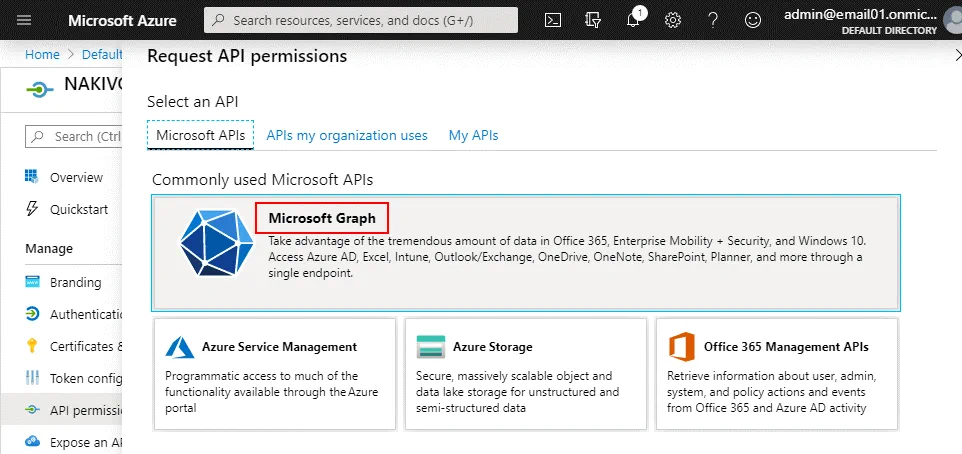
In the adjacent window, hit Microsoft Graph.
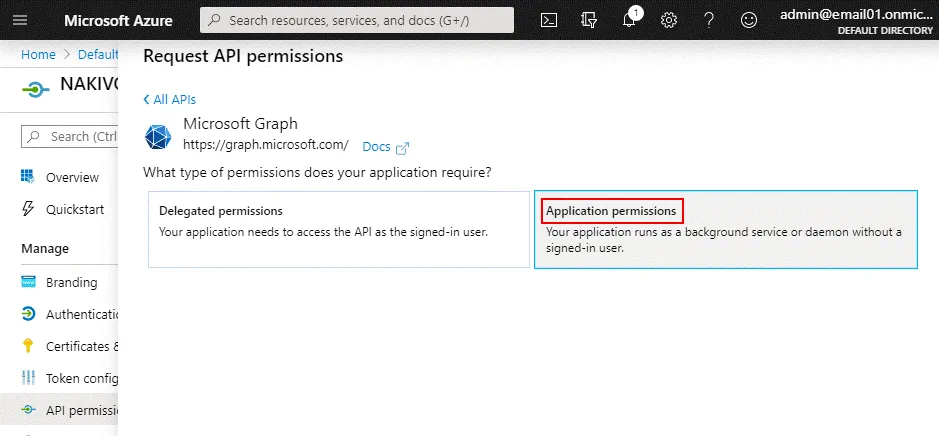
After that, click Application permissions.
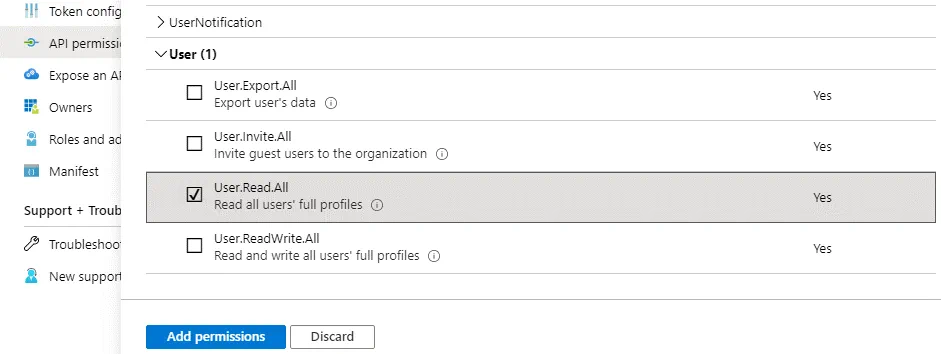
Add together the necessary permissions in the Request API permissions window. Tick the checkbox near the post-obit strings:
Mail service>Mail.ReadWrite
User>User.Read.All
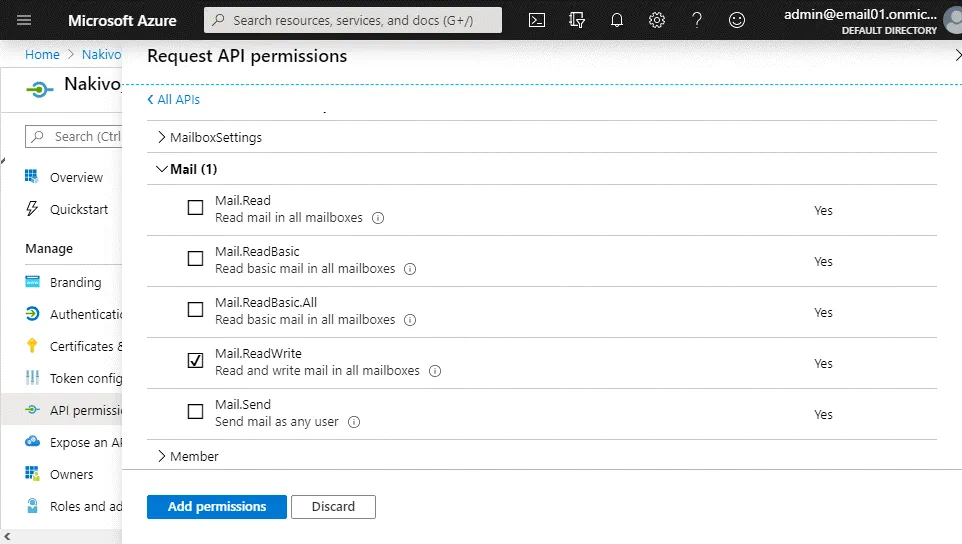
Subsequently ticking the checkboxes, click the Add permissions push button in the bottom of the window.
The two entities you lot added before are now displayed in the API permissions department, but their status is Not granted. Click Grant admin consent for [your directory name]. In this instance, the Default Directory proper noun is used.
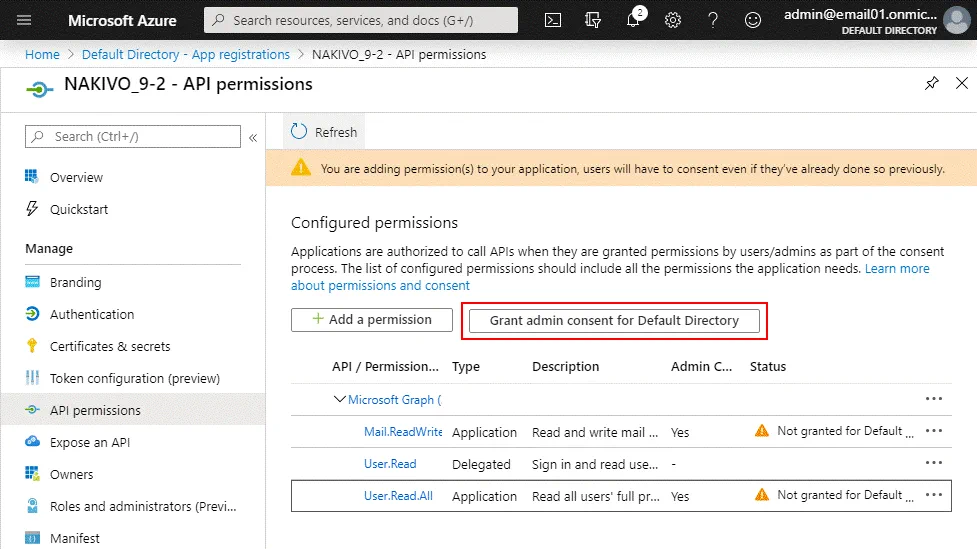
The confirmation message is displayed:
Practice yous want to grant consent for the requested permissions for all accounts in Default Directory? This will update whatever existing admin consent records this application already has to match what is listed below.
Click Yes.
At present the status of the entities is Granted.
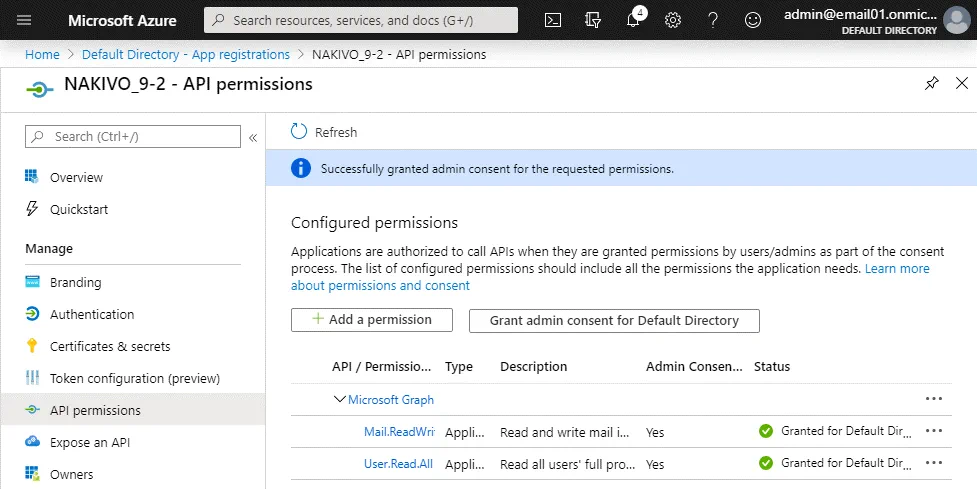
This means that at present you can generate a customer secret ID.
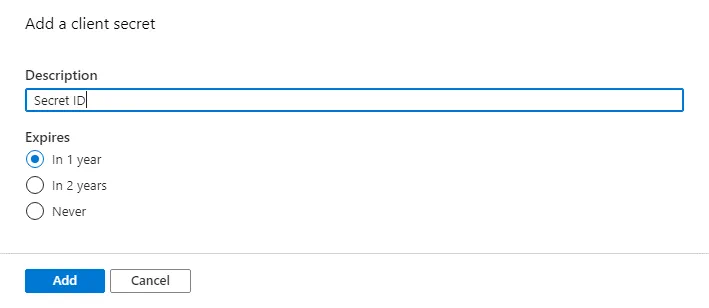
Go to Certificates and secrets and click New customer secret.
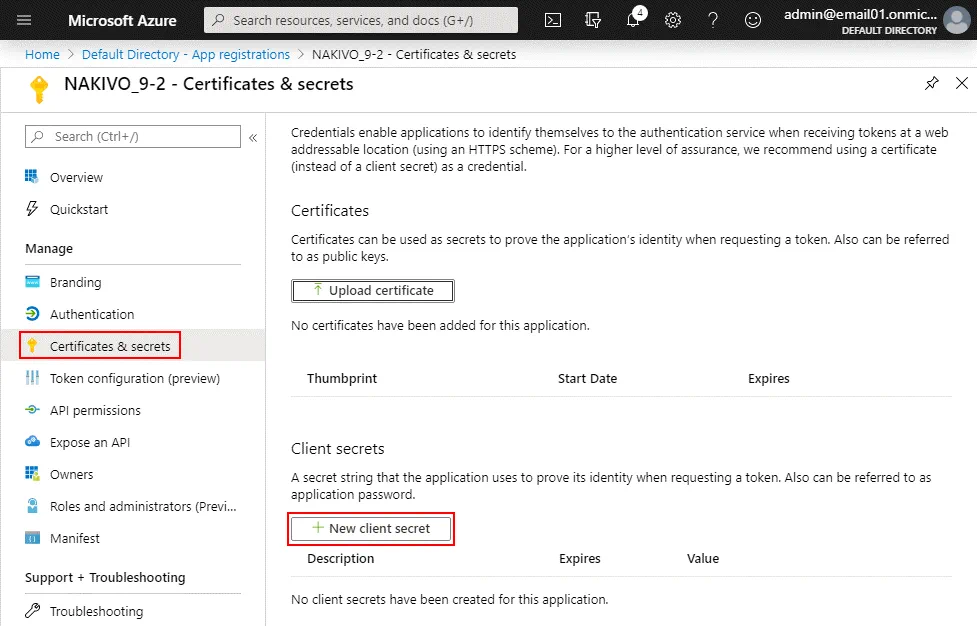
Type Hugger-mugger ID equally the description and define the expiration period, for example, by setting the secret to elapse in 1 year. Click Add together.
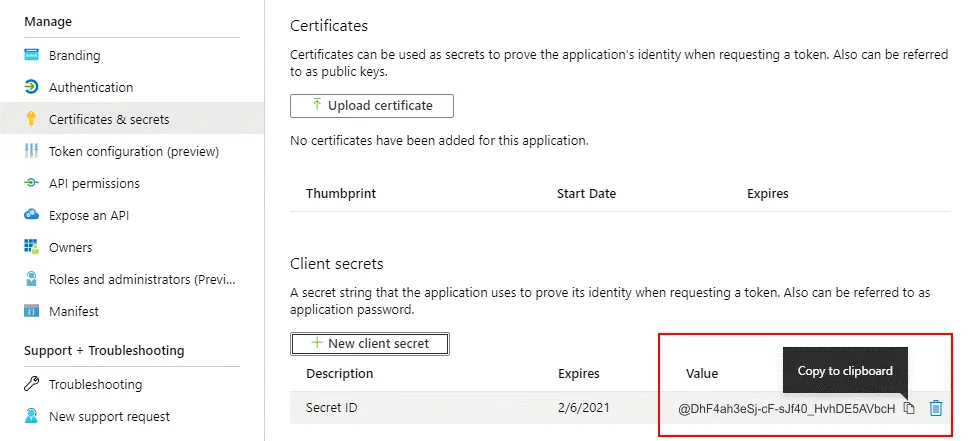
Now the cloak-and-dagger ID is displayed. Re-create the secret ID value and proceed this information secured in a safe identify.
@DhF4ah3eSj-cF-sJf40_HvhDE5AVbcH
Adding Office 365 account to Inventory
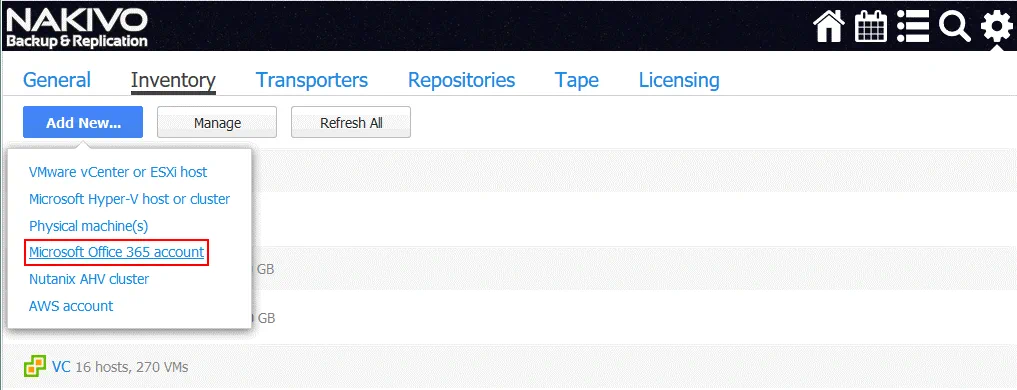
One time you have all the needed IDs (credentials) and configured Office 365 on the Azure side, yous tin become to configuration of NAKIVO Backup & Replication. Commencement you demand to add your Part 365 account to Inventory. Open the web interface of NAKIVO Backup & Replication, go to Configuration and select the Inventory tab. Click Add together New and in the drop-downwardly menu, select Microsoft Function 365 business relationship.
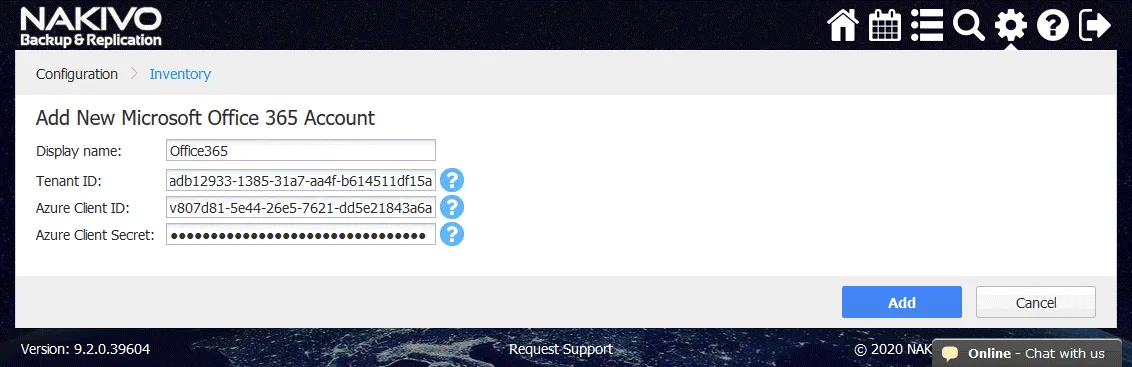
Add new Microsoft Role 365 account by entering the name and credentials. Utilise the credentials that you nerveless before in the Azure Active directory configuration.
Display Proper noun: Role 365
Tenant ID: adb12933-1385-31a7-aa4f-b614511df15a
Azure Client ID: vv807d81-5e44-26e5-7621-dd5e21843a6a
Azure Client Secret: @DhF4ah3eSj-cF-sJf40_HvhDE5AVbcH
Click Add.
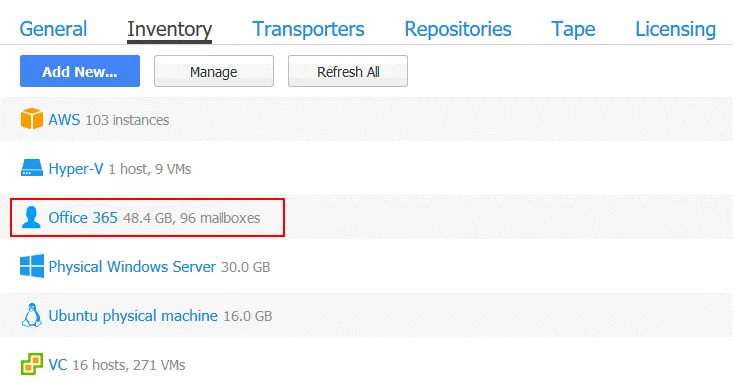
If y'all entered the right credentials, you will encounter your Office 365 account appear in Inventory in a moment. The total amount of used storage and number of mailboxes is displayed after calculation an Office 365 account to Inventory.
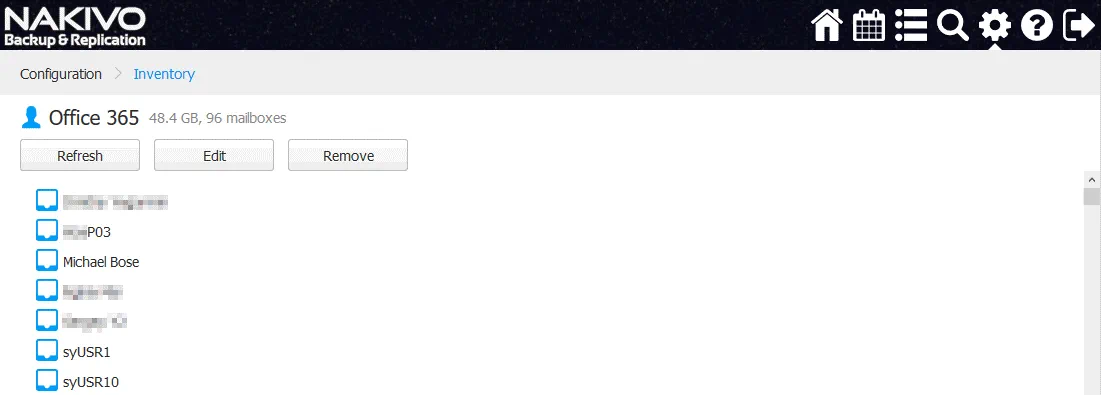
You can click your Office 365 business relationship name and meet the list of Part 365 users of your system (domain).
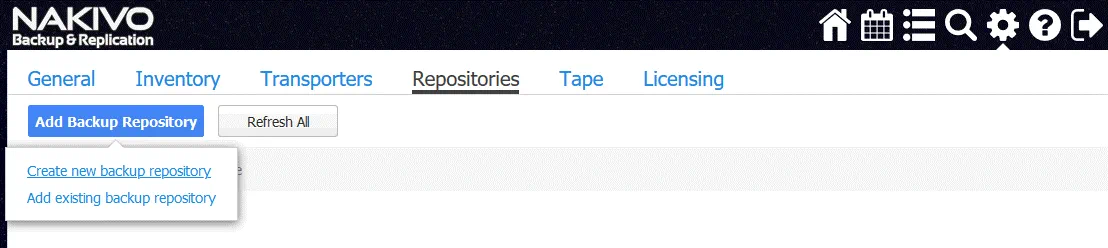
If you lot already use NAKIVO Fill-in & Replication, you know that if you want to run a fill-in chore, y'all should set a backup repository. Notice that Office 365 backup requires you to create a special Microsoft Office 365 repository type. Let's create a new backup repository for Role 365. Go to Configuration > Repositories, click Add Backup Repository and select Create new backup repository.
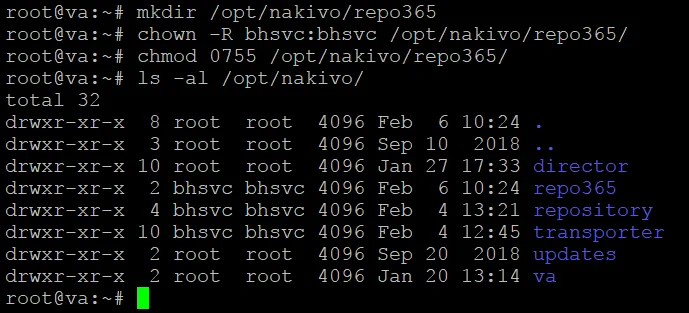
Y'all should create a directory for your Microsoft Office 365 backup repository on the automobile where NAKIVO Backup & Replication is installed. In our example, the product is running on a Linux motorcar and /opt/nakivo/repo365 will be the directory used for the Office 365 backup repository.
Create a new directory on a Linux machine running NAKIVO Backup & Replication:
mkdir /opt/nakivo/repo365
Make the NAKIVO user to be the owner of the directory:
chown -R bhsvc:bhsvc /opt/nakivo/repo365
Gear up the right permissions for the directory:
chmod 0755 /opt/nakivo/repo365
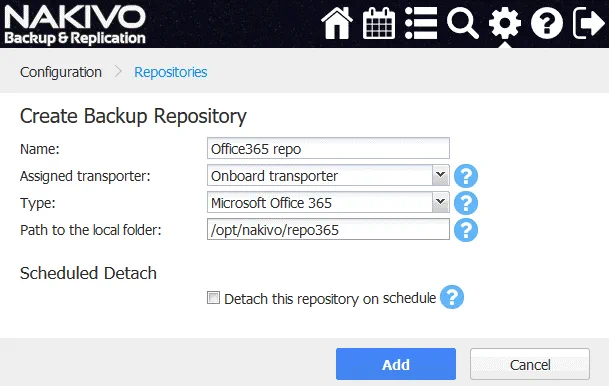
At present you can enter the parameters for the new Office 365 backup repository.
Name: Office365 repo
Assigned transporter: Onboard transporter
Blazon: Microsoft Office 365
Path to the local folder: /opt/nakivo/repo365
Hit Add to finish creating a new backup repository for Office 365.
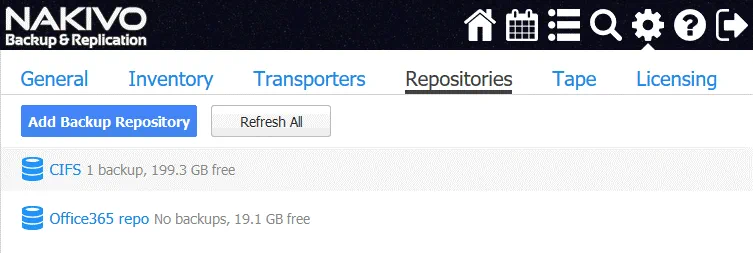
On the screenshot beneath, you can run into that a new Microsoft Office 365 backup repository has been successfully created.
Creating a Microsoft Role 365 backup job
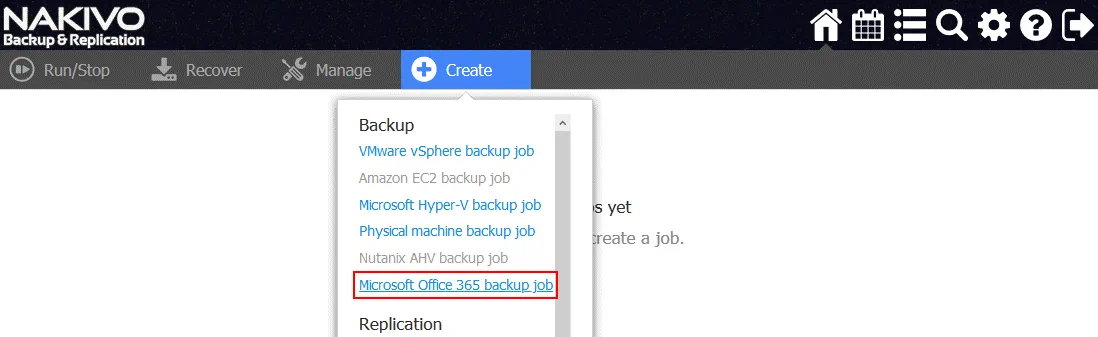
In one case your Role 365 account is added to Inventory and Part 365 backup repository is created, you can create a new Function 365 backup job to back upward the email data of your users. On the home folio of NAKIVO backup & Replication spider web interface, click Create and select Microsoft Function 365 backup job.
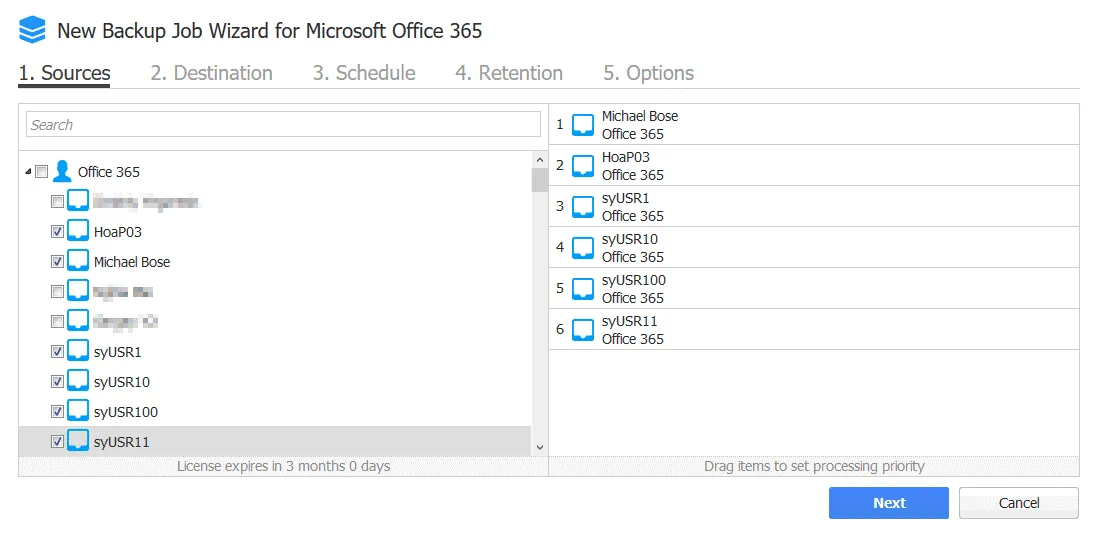
The New Backup Task Magician for Microsoft Part 365 is opened.
one. Sources
Select the necessary mailboxes that you would similar to back up. Tick the checkboxes next to the advisable users to select them. Hit Adjacent to continue for each step in the wizard.
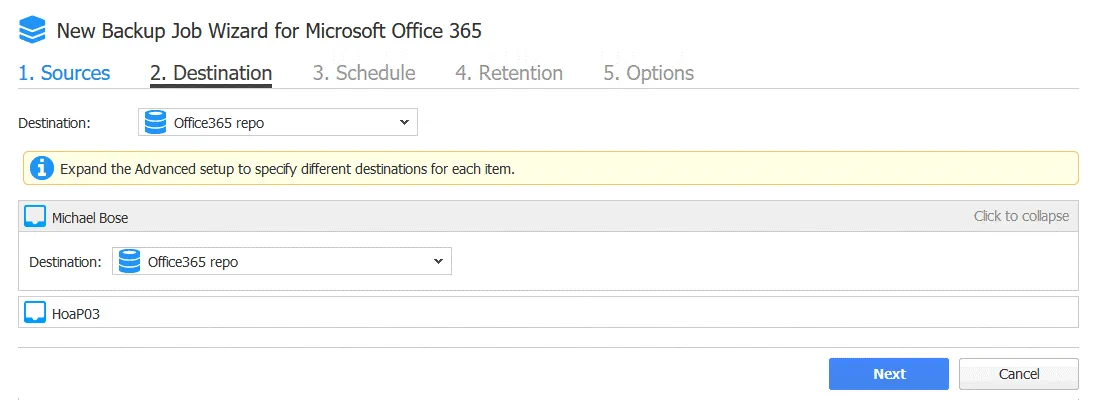
2. Destination
In the driblet-down bill of fare, select Office365 repo you created earlier as a backup repository for Office 365. If you lot have multiple fill-in repositories for Function 365, you can click each account and select a custom backup repository for each account.
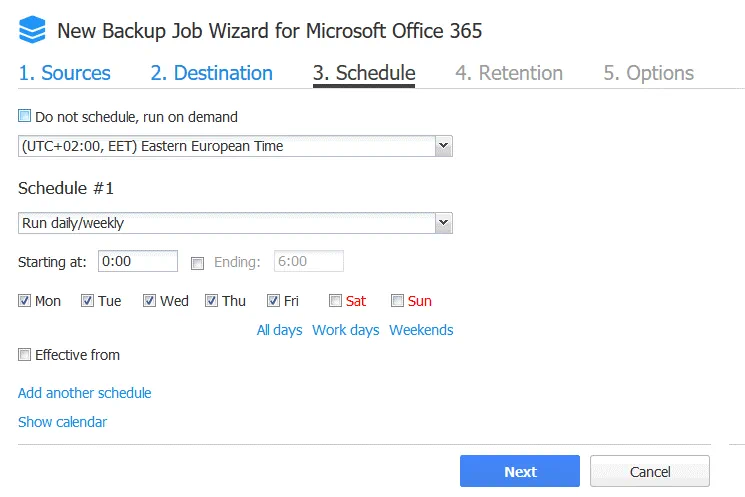
3. Schedule
Select the scheduling options for a backup job as you usually would.
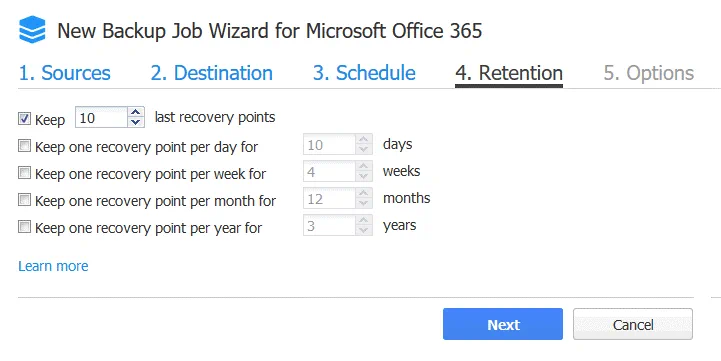
four. Retention
Similarly, select memory settings that are typical for your backup jobs in NAKIVO Backup & Replication.
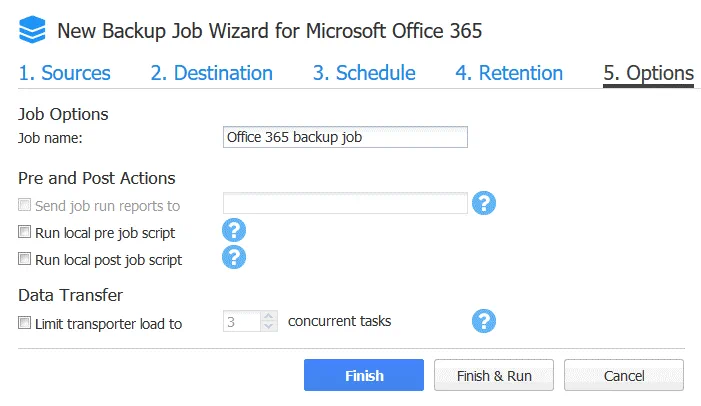
5. Options
The final step of the magician is to select Office 365 backup chore options. Enter the job name, for example, Office 365 backup job and gear up boosted options if needed. Striking Finish & Run to save Part 365 backup job settings and run the chore.
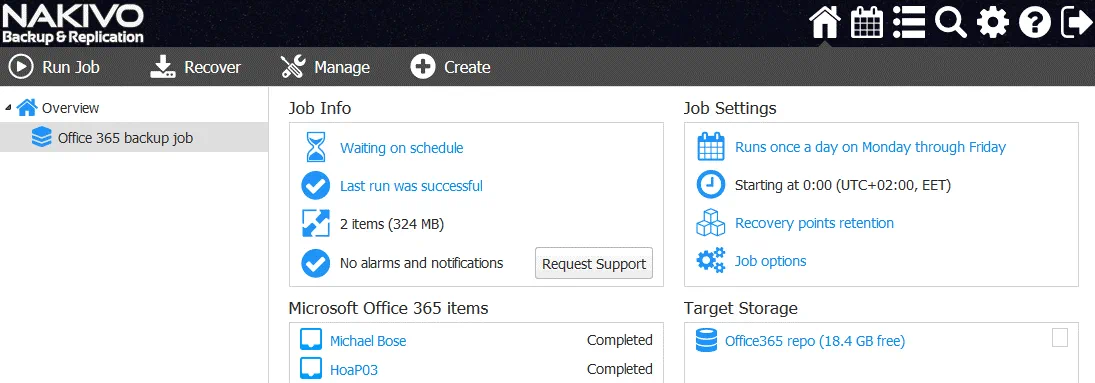
You can meet the progress and chore status on the master folio of the web interface when selecting the job.
How to Recover Deleted Emails in Role 365 from Backups
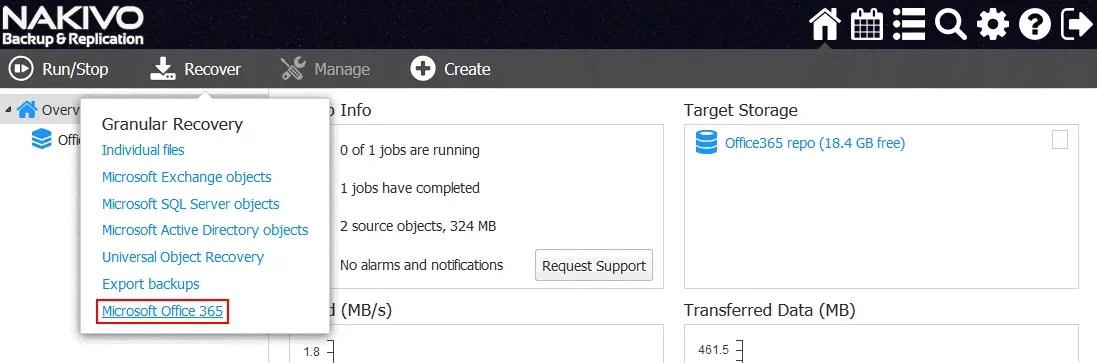
Now you have a fill-in of your Office 365 mailboxes created in NAKIVO Fill-in & Replication. It means that it is possible to recover the unabridged email business relationship or custom email messages. Permit's recover an email message from the Role 365 backup. On the home page, click Recover > Microsoft Office 365.
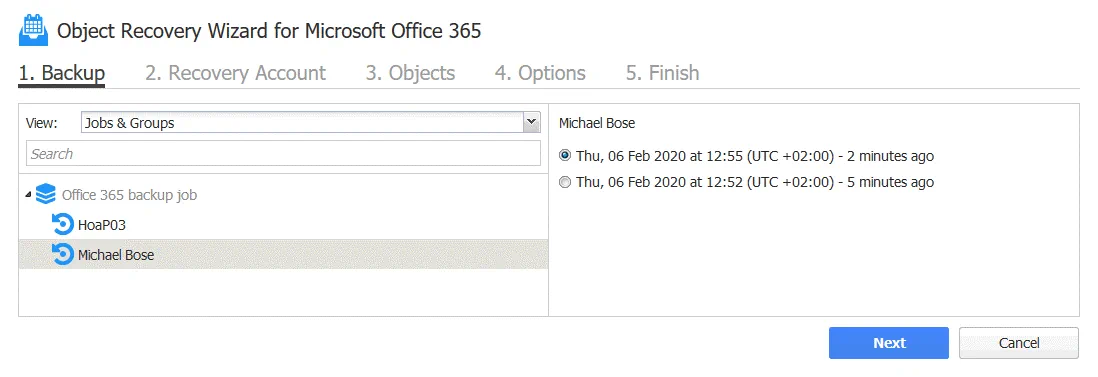
The Object Recovery Wizard for Microsoft Function 365 is opened.
ane. Fill-in
In the left pane, select the required Office 365 backup job, click the job name, and select the required user(southward) whose mailbox(es) you lot wish to recover. In the right pane, select a recovery point. By default, the latest recovery betoken is selected. Hit Side by side to go on for each step in the wizard.
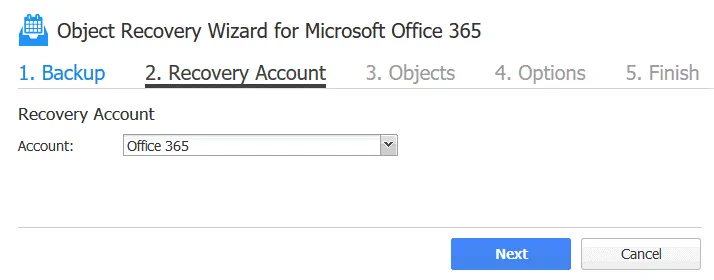
2. Recovery Account
If you have 2 or more Microsoft Office 365 accounts, you lot can select the required business relationship from the drop-down menu.
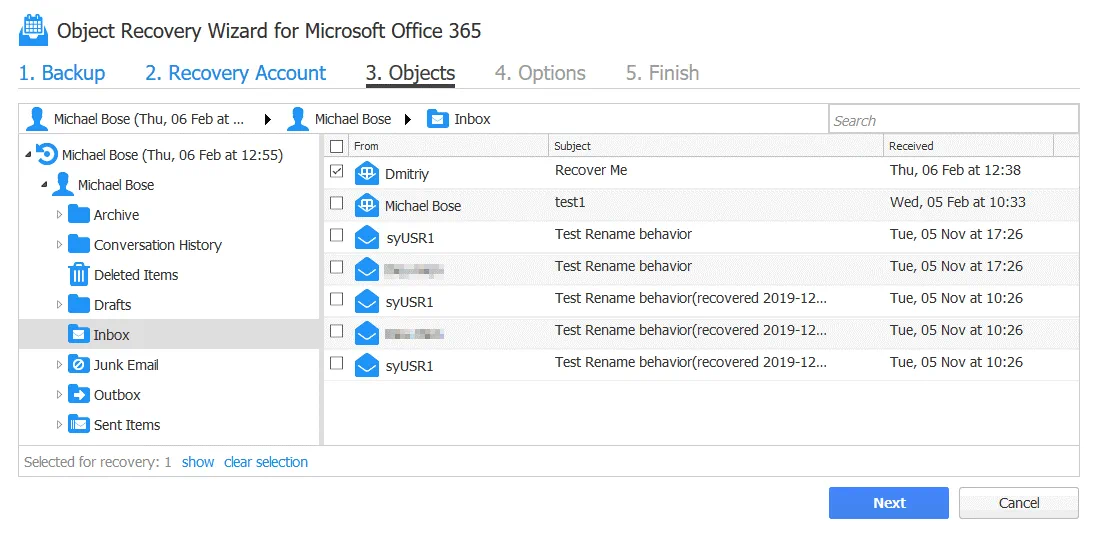
3. Objects
On this step, you can select the necessary users and view email folders (click the user to expand folders). Let's recover the email message whose subject area is "Recover Me" in the Inbox folder. Tick the checkbox well-nigh the messages you wish to recover by clicking on them. In our example, we recover the email message received by Michael Bose.
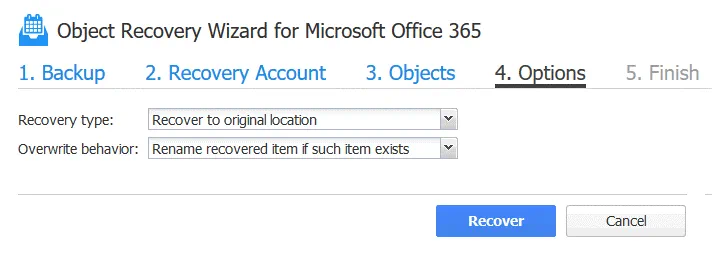
4. Options
At this footstep, you can configure two parameters.
Recovery blazon:
- Recover to original location. Emails are recovered to the original location of the source user account.
- Recover to mailbox. Emails are recovered to the advisable folder of another selected user.
Overwrite behavior:
- Rename recovered item if such an item exists.
- Skip recovered item if such an detail exists.
- Overwrite the original item if such an item exists.
In this example, we are recovering the e-mail to the original location.
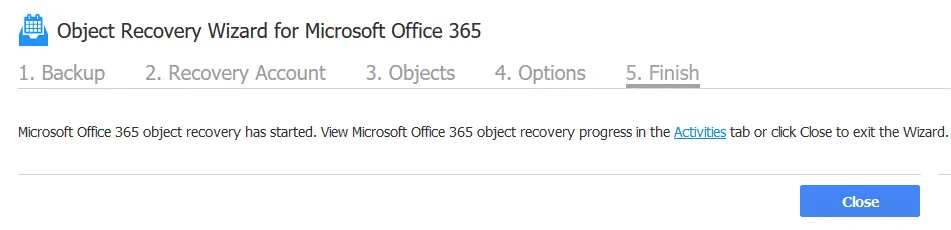
Hitting Recover to recover deleted emails in Office 365 with NAKIVO Backup & Replication.
5. Stop
You lot tin can see the status of the Role 365 recovery job in the Activities tab, or click Shut to go out the Wizard.
On the screenshot below, you can come across the condition of the Microsoft Role 365 recovery job displayed in the Activities tab.
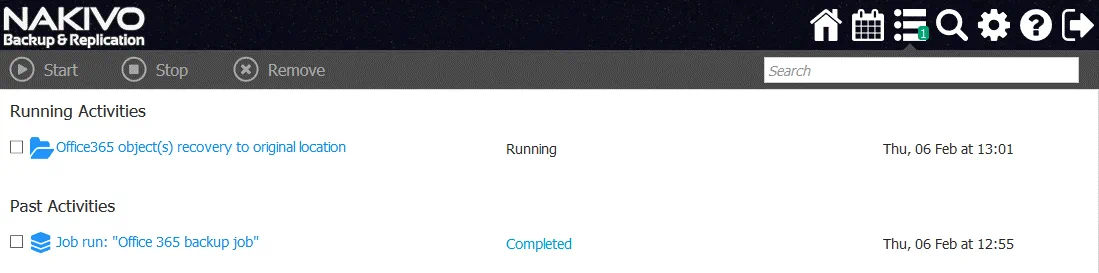
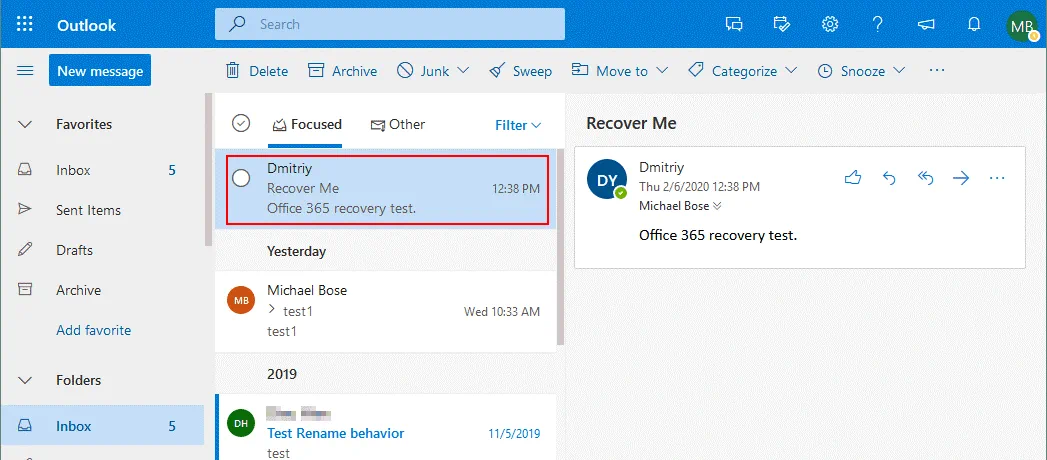
In one case the job is consummate, you tin can open the web interface of Microsoft Part 365 Outlook and log in as a user to the account to which yous have recovered the e-mail data. In our case, this is the account of Michael Bose. Every bit we recovered the email bulletin to the source location, let's check the Inbox folder. The bulletin has been recovered successfully and information technology is present in the Inbox folder .
Conclusion
In that location are a couple of recovery options for Microsoft Office 365 mailboxes and today's blog postal service has covered the most affordable of them. Having a backup in identify plays an important role when information technology comes to recovering deleted e-mail messages, and defines Microsoft Part 365 recovery strategy. Without creating backups, you tin but recover deleted emails inside 60 days in the web interface of Role 365. If you use an email client, then you have a local re-create of emails that can assistance if your account becomes compromised, blocked, or wiped out. If you have deleted an electronic mail bulletin in the email client that is properly configured, the message tin be still accessed in the web interface of Office 365. The best option is to perform backup of Office 365 email accounts regularly. NAKIVO Backup & Replication can protect your Office 365 email accounts past running backup jobs automatically and regularly. If a user has lost an e-mail bulletin, granular recovery allows you to recover the advisable email messages without recovering entire mailboxes.

Source: https://www.nakivo.com/blog/how-to-recover-deleted-emails-office-365-guide/
0 Response to "O365 Recover From Deleted Items How Long to Appear Again Inbox"
Post a Comment