How to Upload Personal Files on Salesforce
Upload and link files using the Salesforce Connector in Mule iv
Overview
Querying or upserting data into Salesforce objects is a unproblematic process with MuleSoft and the Salesforce Connector. You can retrieve a Contact record, or update an Business relationship through a unmarried performance more often than not in Anypoint Studio. Just at that place are some utilise cases where y'all need to combine multiple operations to handle a job in Salesforce. One of which, that comes up often, is uploading and attaching a file to an object.
This article will show you how to build a menses that uploads a file using the Salesforce Connector and links it to a Contact object in a simple Mule menstruation. The source will be a file picked upwardly by the File Connector but you lot can swap out that source with anything that results in a file in the payload.
Build Flow in Anypoint Studio
Setup Menstruation
We're going to commencement with setting up a new project and add the necessary components into the Mule Palette. In the next section, we'll walk through the process of configuring each component.
- Open Studio and create a new project

- In your project, add the following components into the Mule Palette
- File
- Salesforce
- Secure Properties (Optional)

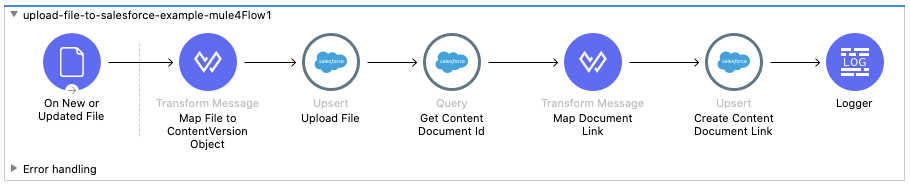
- Drag and drib the following components into your period.
- File > On New or Updated File
- Core > Transform Message
- Salesforce > Upsert
- Salesforce > Query
- Core > Transform Message
- Salesforce > Upsert
- Logger
- The flow should look like this:
Configure 'On New or Updated File'
For the source of the period, we're going to set up ii folders under src/chief/resource. The File component volition heed for and pick upwards the file for processing from the first folder, and then drop the file into the second binder.
- Right click on src/master/resources in the Bundle Explorer of your project binder and select New > Folder

- Give the folder a proper noun (e.g. in) and click on Finish

- Echo steps 1 and 2 but create some other folder in the same directory name out. The folder structure should look similar this:

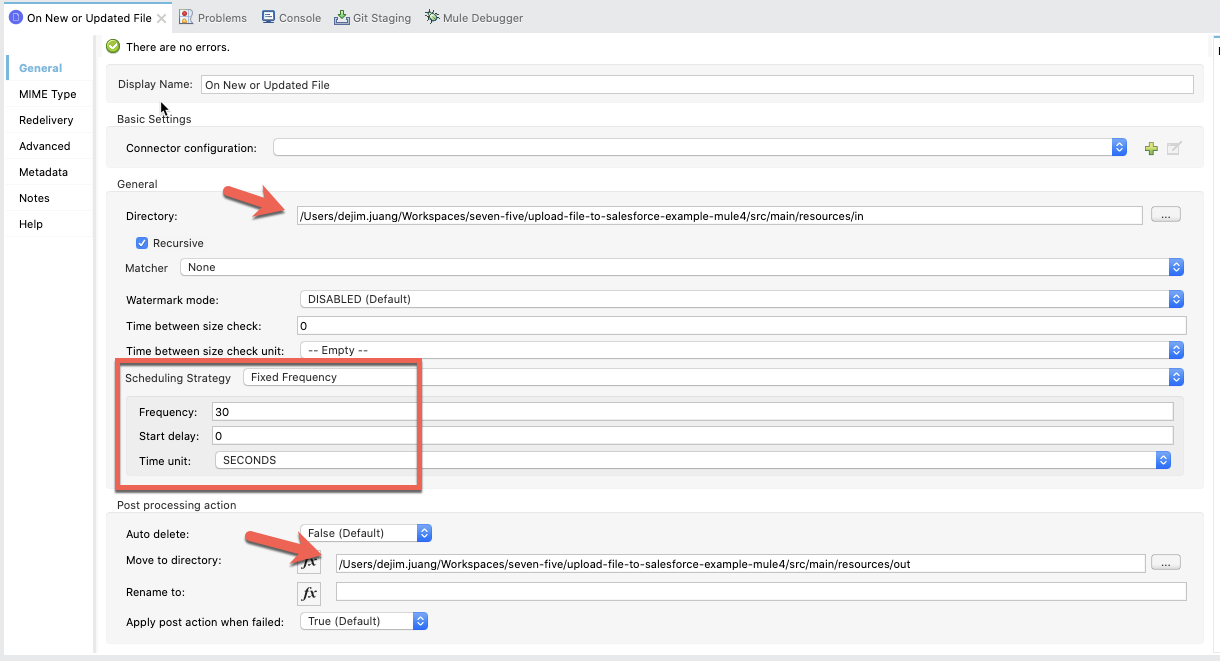
- Next, select the On New or Update File component to bring up the Mule Properties window.
- Configure the following fields:
- Full general > Directory
- This should signal to the in folder that yous added to src/primary/resources
- Post processing action > Motility to directory
- This should point to the out folder that you lot added to src/main/resources
- (Optional) General > Scheduling Strategy
- You tin modify this accordingly to run with a larger interval (e.g. every 30 seconds)
- Full general > Directory
Configure 'Transform Bulletin' – Map File to ContentVersion object
The next component is a Transform Message that takes the file and maps it to the Salesforce ContentVersion object.
- Select the Transform Message component and paste the following DataWeave script into the script editor. The file is stored into the ContentVersion object every bit a byte array.
%dw 2.0 import * from dw::core::Binaries output application/coffee --- [{ PathOnClient: attributes.fileName, VersionData: payload as Binary { class: "byte[]" } }] Configure Salesforce Upsert – ContentVersion
With the data mapped, the next step will be to run the Salesforce Upsert operation. This will accept the file and upsert the information into the ContentVersion object.
- Select the Upsert component to open the Mule Properties window
- Click on the dark-green plus sign side by side to the Connector configuration dropdown field in the Basic Settings department.

- Fill in the following fields under the General tab for a Basic Authentication connexion:
- Username
- Password
- Security Token

- Click on OK
- In the Mule Properties window, set the fields to the following values.
- Object Blazon: ContentVersion
- External id field name: Id

Configure Salesforce Query – Get Content Document Id
Subsequently the file has been uploaded to the ContentVersion object, we demand to get the Content Document Id that gets generated by Salesforce. In guild to do so, nosotros need to run a query against the ContentDocumentId object past querying for the Id that was returned from the Upsert operation.
- Select the Salesforce Query component to open up the Mule Backdrop window.
- The Connector configuration field should already be populated with the configuration that we set up in the previous footstep. If not, go back and follow steps one through 4.
- In the Full general > Salesforce query: box, paste the following SOQL script:
SELECT ContentDocumentId FROM ContentVersion WHERE Id = ':cvId' - Nether the Parameters section, click on the dark-green plus sign and add the following.
- Proper name – "cvId"
- Value – payload.items[0].id

Configure 'Transform Bulletin' – Map Document Link
The next component is a Transform Message that takes the ContentDocumentId from the query and a Contact object Id and maps that to a ContentDocumentLink object that will exist upserted into Salesforce.
- Select the Transform Message component and paste the following DataWeave script below into the script editor.
- You'll need to alter the script and supersede the LinkedEntityId with the Id for the object that you want to link the file to. If y'all're using the projection from Github, y'all tin can set up the Id in the backdrop file to be picked upwardly.
%dw 2.0 output awarding/java --- payload map ( payload01 , indexOfPayload01 ) -> { LinkedEntityId: p('secure::sfdc.object_id'), ContentDocumentId: payload01.ContentDocumentId } Configure Salesforce Upsert – Content Document Link
The mapping from the previous step will exist passed to this functioning in the payload to upsert and create the document link between the file and the Contact object.
- Click on the Salesforce Upsert component to open the Mule Properties window.
- Set up the fields to the following values.
- Object Type: Content Document Link (ContentDocumentLink)
- External id field proper noun: Id

Configure Logger (Optional)
This footstep is optional. This will simply output the result from Salesforce on whether the previous performance was successful or not to the panel.
- In the Message field, click on the fx button and paste the following DataWeave script
output application/json --- payload 
Run Example
Now that the menstruation is configured, allow's go alee and run the projection to see it in action.
- Right-click on the sheet and select Run project <project proper name>

- Once the Console window says the project is deployed, switch to your OS file browser and navigate to your project.
- Drop a file into the in binder under src/master/resources
- Afterwards the expected interval, you should see the file moved to the out folder.
- Switch back to Anypoint Studio and review the Console. Y'all should meet the post-obit output from Salesforce.

- Next, switch to your Salesforce instance and login.
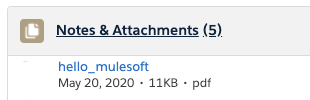
- Navigate to the Files navigation particular to come across the uploaded file.

- So switch to the Contact tape that you configured the project to link the file with. If everything was configured correctly, you should come across the following under Notes & Attachments
Summary
As you can see with the project you just created, uploading a file to Salesforce is incredibly piece of cake with MuleSoft. While the projection is pretty basic, you tin hands extend information technology to your utilize cases to change the source of the file, the object that is linked with the file, etc… With unproblematic elevate and drop components and the ease of configuring these components to handle transformations and mappings, MuleSoft opens up endless possibilities of integrating your systems and edifice APIs to expose data. A working example from this postal service tin can exist institute here.
If yous see any issues, or have any questions, don't hesitate to to leave a comment below.
Overview Querying or upserting data into Salesforce objects is a simple process with MuleSoft and the Salesforce Connector. You can retrieve a Contact tape, or update an Account through a single operation generally in Anypoint Studio. Merely there are some utilise cases where you demand to combine multiple operations to handle a task in Salesforce.…
Source: https://dejim.com/upload-and-link-files-using-the-salesforce-connector-in-mule-4/
0 Response to "How to Upload Personal Files on Salesforce"
Post a Comment